How to copy Idocs from one system to another?

Having recent data on quality, test systems and test clients is quite useful for speeding up problem fixing and development. Idocs are a common message type for business data. Read here, how easy it is to provide recent Idocs of the production system to your quality or test system.
In the SAP community you will find lots of questions related to this problem. Usually the answer is to use WE19 for writing the Idoc data into a file. This file then can be used for inserting the Idoc in another system / client. If it is about different systems, typically you have to download the file from the source SAP system and upload it in the target SAP system. The "Inbound File" function is to be processed for each and every Idoc you want to copy.

For a single or a few Idocs, this may be a reasonable task. But not for a larger number of Idocs.
With the "Download / upload table data" function of "Shortcut for SAP systems" copying Idocs can be done very fast and flexibly. By downloading data of 3 tables you will get the data.
- EDID4 - This table keeps the data of the Idocs.
- EDIDC - This table contains the control records (the header information) of the Idocs.
- EDIDS - This table contains the status records for the Idocs (Idoc added, processed, processed with error etc.).
Using the "Download / upload table data" function for downloading Inbound Idocs of message type DESADV since January 2023 would look like this:

After choosing the connection to our target system / client (1), we select the "Download" option and specify an output file ((2) and (3)).
Then (4) we choose an appropriate file type. The file type depends on what we are going to do with the downloaded file. You will find some information in the documentation on the right side of the window (and also here). There are the file types 'ASC', 'BIN' and 'DAT'. As we are going to upload the file in the target system, especially the file types 'DAT' and 'BIN' are of interest. In case source and target system have the same character set and endianess, 'BIN' is a good choice. But a 'BIN' file is poorly readable and should not be modified with an editor. A file in 'DAT' format is processed slower, but does not have these disadvantages. I choosed the 'DAT' file type here.
After choosing the client (5) and specifying the table (6) I reduced the amount of data to my needs: I only want to get Inbound Idocs of message type 'DESADV' created from the beginning of 2023. Notice the 'where condition' (7): the information about message type, direction and creation date is in table EDIDC - by using a subquery I get the Idoc numbers and can apply this selection to the table EDID4 for getting exactly the Idocs I want to copy.
The free text input of the 'where conditon' may look a bit nerdy, but - as you can see here - offers in return a lot of flexibility and possibilities!
After clicking on the "Execute" button (8) the download begins. With the "View output" button I can get some information.

Now let's have a look into the file:

Now we repeat this with the tables EDIDC (control records) and EDIDS (status records). All we have to do is to change the name of the file and the table. The 'where condition' fits also for these tables. Finally we have 3 files downloaded.
Now let's move to the target system / client and do the upload:

We switch the connection to our target system / client (1) and select the "Upload" option (2).
There is a flag 'Overwrite existing entries' which we deactivate (3). If our upload would collide with already existing records (same Idoc number) in the target client, we would receive an error message and the upload would not be done. Typically the Idocs in a Quality system have their origin in the last system refresh from the production system and there is no or less Idoc processing directly on the Quality system. So, if our last system refresh is older than the creation date of the Idocs to be copied (January 2023), there is a high probability that there is no collision. However, deactivating the 'Overwrite existing entries' flag keeps us on the safe side.
Then we choose the file (4) containing the EDID4 records downloaded in the previous step, the right file type (5) and name the table (6). The client will be set automatically according to the chosen connection.
After executing the upload (7) we find that the assumption regarding possible collisions was right, the upload was done without errors. We have a look at the details and see that the records were uploaded.

After that we do the same with the tables EDIDC and EDIDS. And finally we have a look into the Idoc list in the target system / client, where we can see the uploaded Idocs. But there is still a task to do:

We copied the Inbound Idocs from PX1, client 100. Therefore, the receiver information is still addressing PX1, client 100. The header information in the control records (EDIDC) does not fit to our target system / client. We have to update them - at least if we want to work with them (which usually is the reason for the need to get Idocs from the Production system into the Quality system).
 in the Idoc control data")
Here the "logical system" is used to identify the receiver of the Idoc. Using the logical system is a common method to add an identification to a document - either as receiver or as originator. Also after system refreshes it is an important task to replace the logical system of the source system / client with the logical system of the target system / client. There is a standard transaction to be used for this: BDLS.
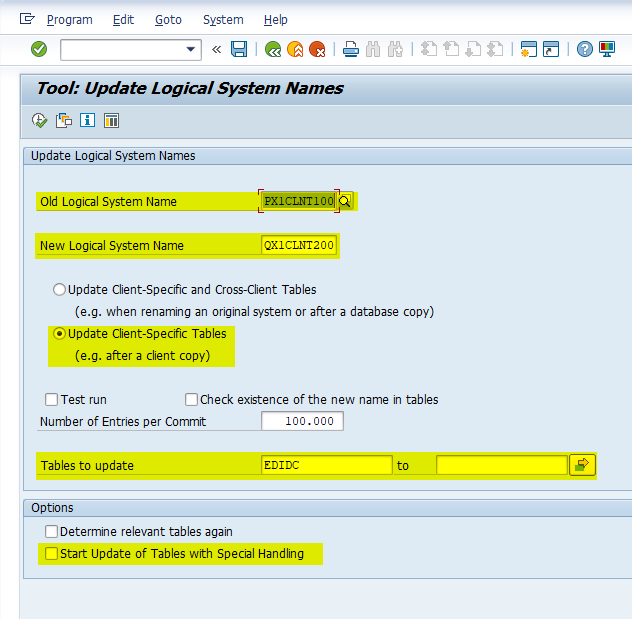
In the BDLS transaction we specify the old / obsolete logical system and the new / right one. We have to update our table EDIDC only (you can also specify EDIDS and EDID4 here, but these tables does not contain logical system information). We deactivate the "Start Update of Tables with Special Handling" as it is only about our EDIDC table. After executing the BDLS, the control records look well:


So finally we copied the Idocs from the Production system to our Quality system. We did not have to develop ABAP programs and did not have to struggle with each and every single Idoc in WE19.
For having the possibility to repeat all the previously described steps in a one-liner-command or for implementing some automatism, we can put all the steps into an XML file and use the command line tool.
In the 'xml' folder - supplied with our product - you can find an example (file 'Example_CopyIdocsFromProdToQuality.xml'), where the above described steps are implemented. Of course it is also possible to use Variants (= variants in Shortcut for SAP systems, not those in the SAP system). Personally, especially when it is a process with more than 1 task, I prefer using XML files.

Based on this you can also implement an automatic, daily copy of Idocs. Just replace the '20230101' in the Where condition of the "DownloadTableData" tasks with @SY-DATUM. and schedule the execution with the command line tool daily.
Es gibt noch keine Rezension.